paddling pool
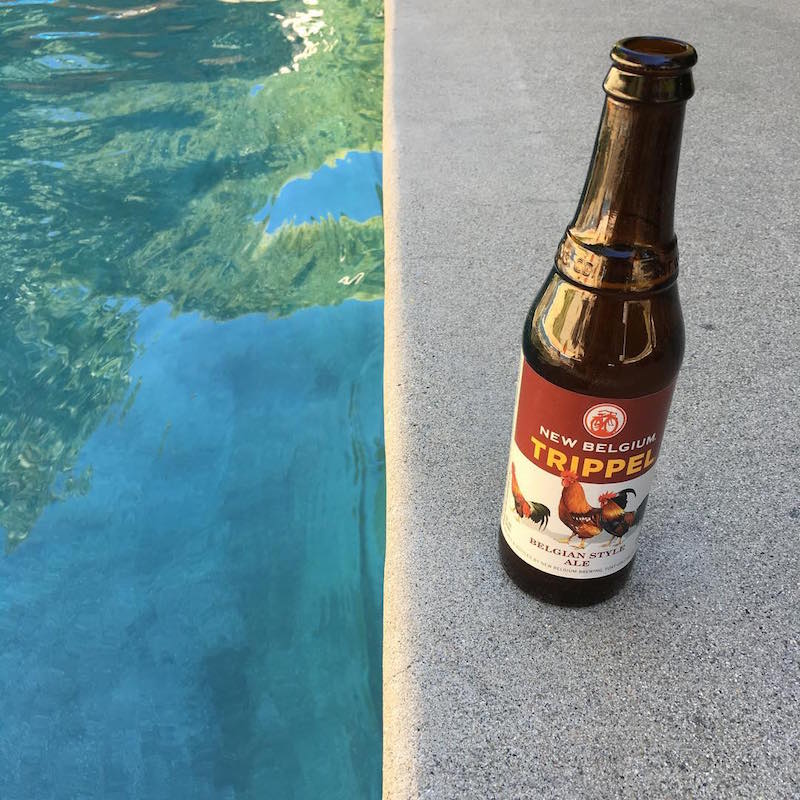
Before moving to Sacramento, we worried about the heat. In reality, it’s more comfortable than the sticky summers we endured in Boston. And certainly preferable to the rainy ones we grew up with, in England. But hot is hot, and when it’s 100ºF+ (as it is all this week) you need some respite. Lucky for us, our lovely neighbors have pools –this is Frank’s, where we enjoy the odd poolside beer.
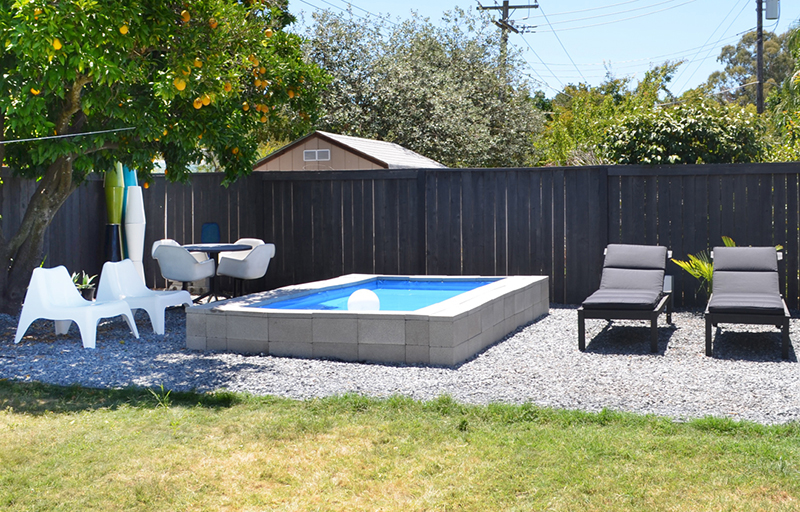
But we can’t spend every day at the neighbors’…can we? Probably not. So we got creative, and used what we had: 80 cinder-blocks (donated by our friend, Andy), a small pool liner (from an abandoned project) and a dash of redneck ingenuity. Let’s be clear, we’re not building a swimming pool here.
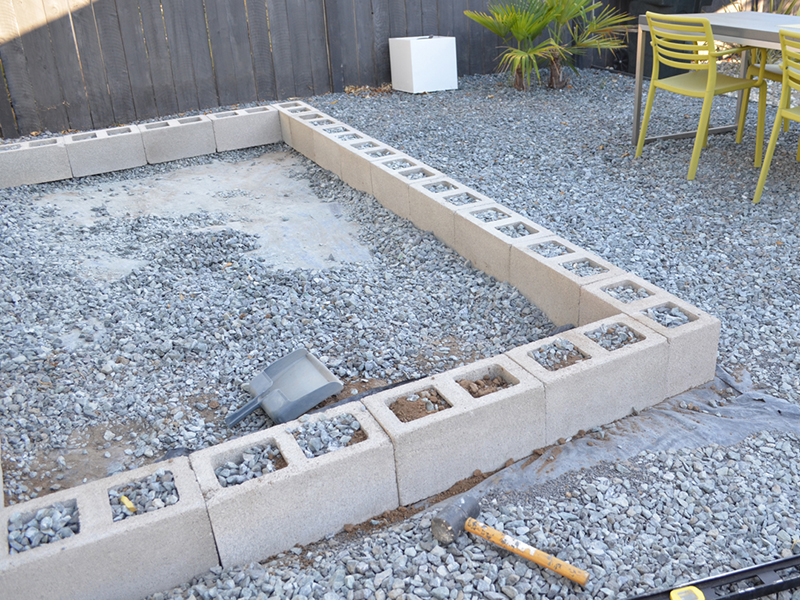
This is a ‘paddling pool’, as we Brits call it –just somewhere to dip your feet and cool off. We (and by we I mean me) moved the cinder-blocks (for the fourth time now) and arranged them in a 9 x 4 block rectangle. We added a second level, and a further row on the long sides.
We used a spirit level and a mallet (the redneck’s friend) to keep the blocks straight and flush. Pretty much. We cleared all the rock from the center, and used this to fill the cinder-blocks, for support. Then we poured 1-2 inches of sand for the base layer.
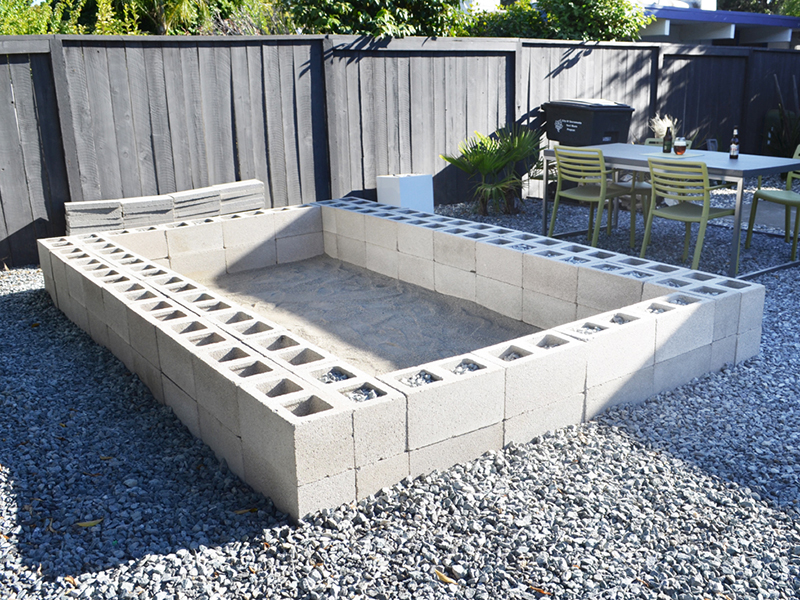
Next we added the liner. Clearly it isn’t tailor-made –you can see how it’s all bunched-up in the corners. Classy. Thankfully, this is as redneck as it gets. The internal measurement is about 10 x 6′ and 16″ deep, so nobody’s gonna be drowning in this thing…or swimming, for that matter.
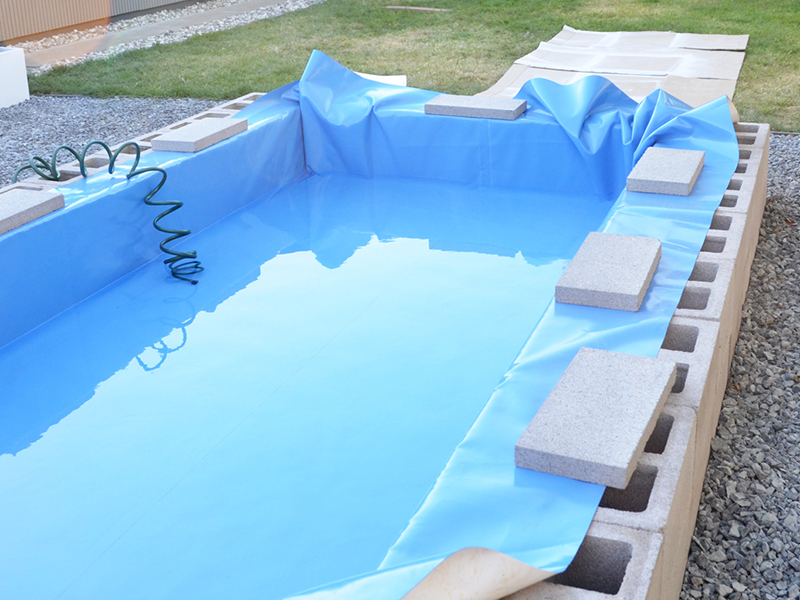
With the pool half-full, we smoothed-out the sides as best we could. Then we folded and cut the corners, to make them as neat as possible. This liner wasn’t expensive (about $40) and we have no other use for it, so we were happy to cut a few corners. If you get me.
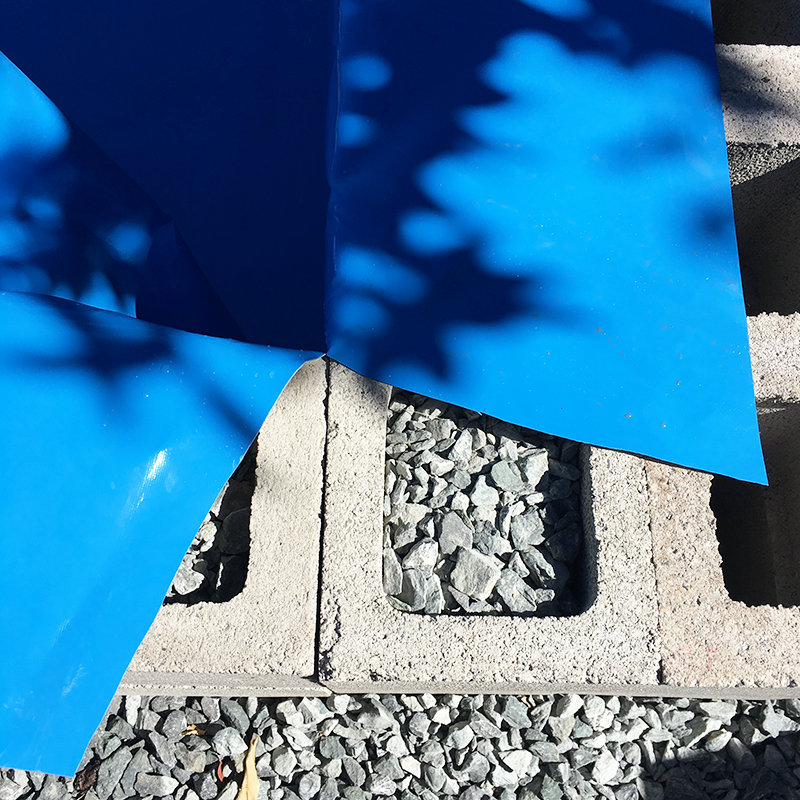
We trimmed the edges, and placed cinder-block caps on top –we had to buy these but will re-use them, when we build a wall back here. “Bobby”, our solar globe light, was first to test out the pool. He liked it. The water looks pretty clear here, but soon attracted dirt, bugs and leaves.
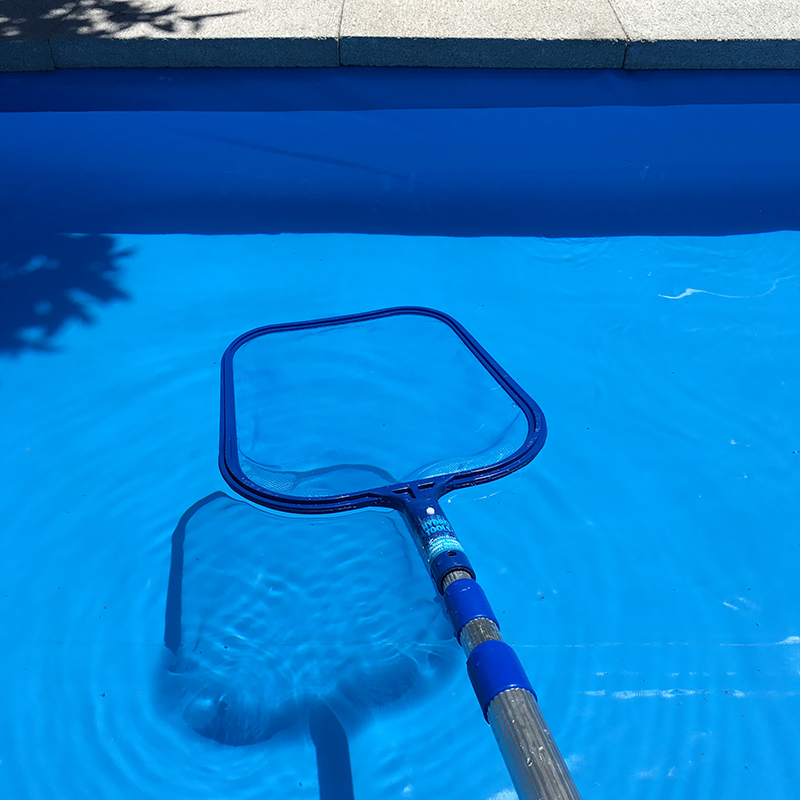
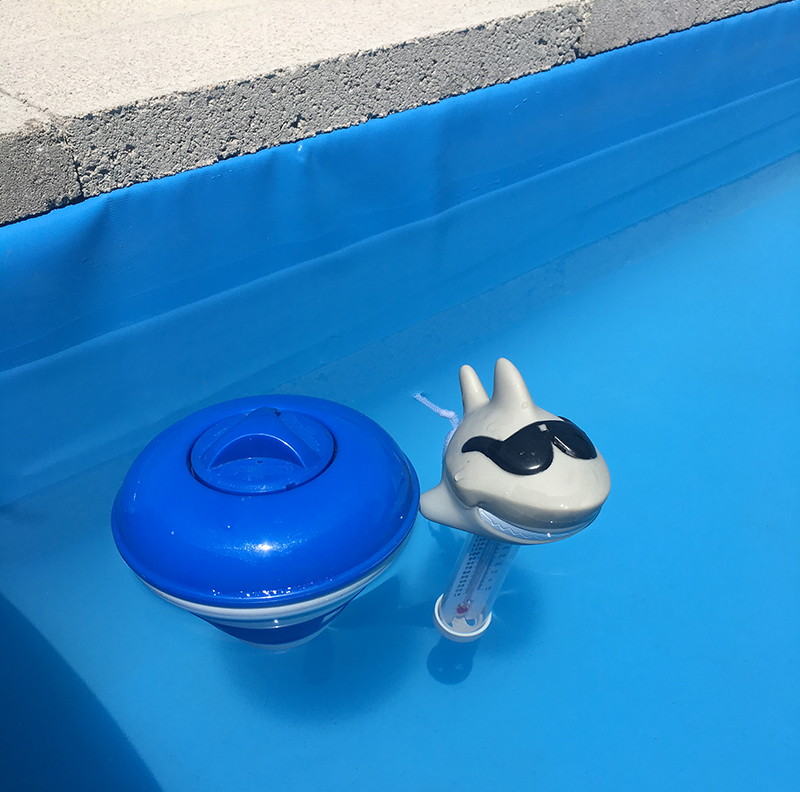
This prompted our first pool accessory purchase –a skimmer. Now we really felt like pool owners. Hopefully you realize this is all very tongue-in-cheek –at this point, we imagined the pool might collapse overnight, or at best last a week. It’s now nearly three.
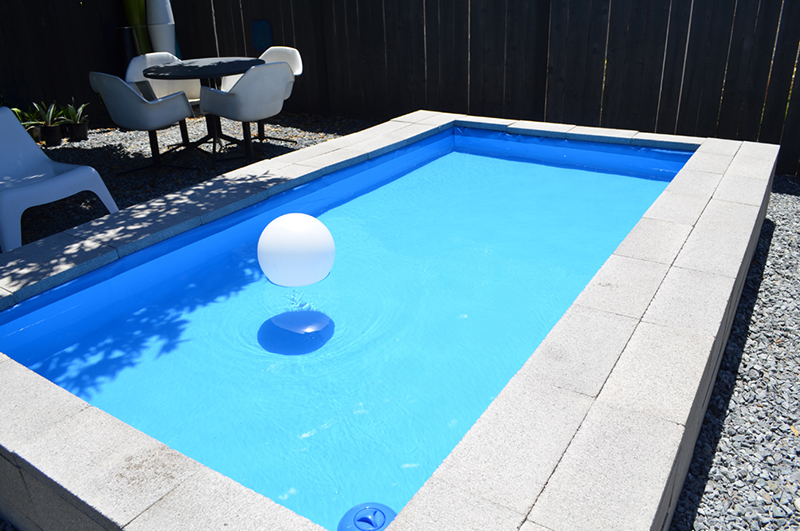
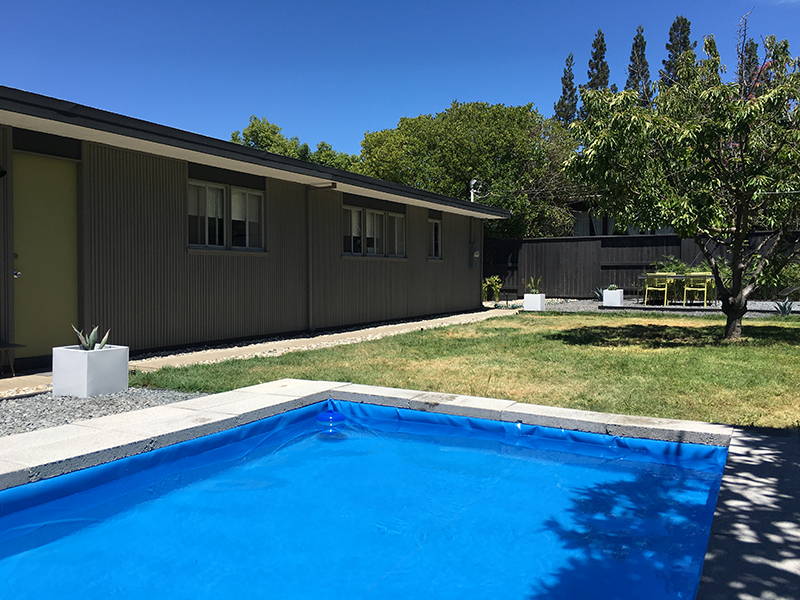
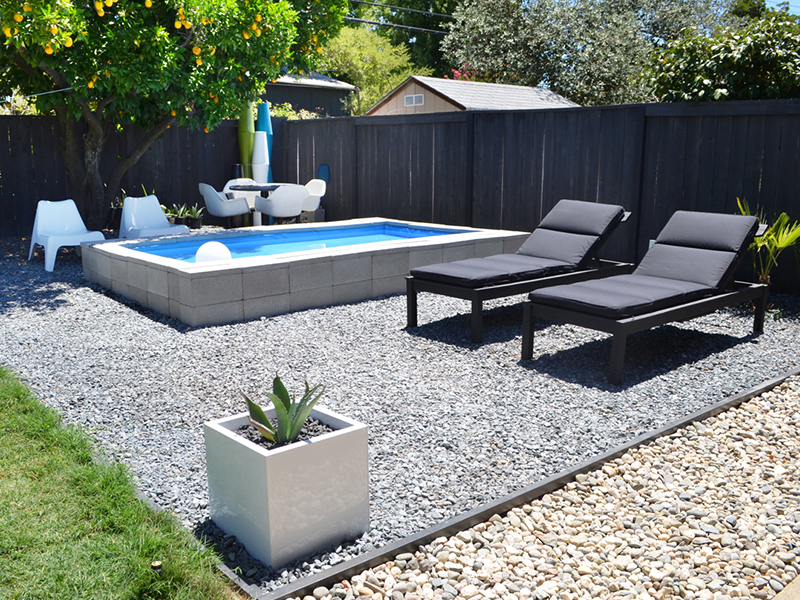
Here’s the pool in context, at the far end of our back yard. We’ve done some work back here, mostly just neatening things up, but haven’t shared, as we’re far from finished. It’s fine for now. Thanks to the water, these loungers fit in better than ever.
And here’s the view back. You can see it’s a big space, and needs some thought. It’s flanked by the least attractive side of our house, which has limited connection to the yard. We’ll remedy that by adding some sliders…eventually. Our side yard is around that corner, in the distance.
This is “Sharkie” –our pool thermometer, who tells us how ridiculously hot the water is. Our record is 96ºF, but it’s a pleasant 80-90ºF most afternoons. We added a mini chlorinator, hoping to keep the pool blue for a while. It’s working so far.
We also made a pool cover, cutting some clear plastic to size. We even bought a ‘floatie’ (called a ‘lilo’ in the UK) which bounces off the sides, like slow-mo pinball. Most items will come in handy when we get a real pool –definitely in our long-term plan.

For now, we’ll make do with this slightly scaled-down version –I jest, but it’s getting plenty of use. We float on it, lie in it, but mostly sit on the side, dangling our feet and sipping a beer. We’ll keep it for the rest of the summer. Or until it turns green.
This project started as a joke –we figured our ‘pool’ would last a weekend at best. We didn’t want the neighbors to see it, and had zero intention of sharing it here. A few weeks’ on, we’ve grown attached to our redneck paddling pool. And oddly proud of it.
Ivy Chesser
Really great Andy and Karen! I never would have thought this would work, at all! But cheers to keeping cool and using what you have. Looks good, too!
Andy
Thank you, Ivy! We didn’t think it would work either! Just seemed like a fun weekend project. It’s definitely making the summer heat more tolerable. Still looking forward to the day we get a real pool though. Cheers!
Val
Such a great creative cost effective idea to staying cool!! Cheers to you both!
tony
Hi Andy. Brilliant – you really should go into the pool business and this could be your “starter” kit. Ingenuity is your watchword for sure. Love “sharkie” – he earns his place in the pool. All you need is a portable ice box for the beers – and plenty of warm sunshine for the rest of the summer.
Andy
Hi Tony. You’re too kind, as usual –but thank you! I think we’ll call in the professionals when we want a real pool! We are thinking an outdoor fridge may be in our future too, though an ice box would suffice for now. We have warm…in fact HOT sunshine in abundance, so we’re good there!
Sharon
I used a large stock tank for my backyard.If you put a small amount of stock once a week it makes a huge difference.
Kathy
Very cool! 😎 We made raised garden beds this way last year and this year cinder block and 3×3 posts. Just add some pretty bench cushions. I love the idea of an area to just sit and cool the feetsies! I would definitely add a lighted solar fountain. A lot of work for a temporary pool though. We had a twenty four foot above ground but I was the only one who would maintain the thing AND I can no longer climb the ladders so, bye bye pool. This I might consider but with some additional support,(rebar) in the cinder blocks and some sort of filtration system. I lika!!! Great job!
jim
Love the paddlling pool.
If you could find a way to add a small fountain to the pool and run it at night it would help cool the water.
Andy
Thanks Jim! Appreciate the suggestion too. The temperature has actually been fine, overall. 96ºF was the result of leaving the cover on, during a very hot day. If we want it cooler, we just leave the cover off overnight.
Steve Wittmann
I like the pool and the design is similar to one I used for a raised veggie bed in my yard.
I have a couple of suggestions to improve stability that you might try if you have to re-build at some point. Try staggering the concrete block so the seams alternate as they climb. I also added rebar in the corner of the “holes” and drove them down a foot past the lowest block. I pre-cut them to the intended length. I’ve had no shifting problem and I even planted marigolds and strawberries in the filled “holes”. Lifting a few of the caps and putting in ferns in the “holes” might be nice by the fence end of the pool.
Andy
Hey Steve. Glad you like our ‘pool’ –probably a more suitable structure for housing vegetables! Thanks for your suggestions. The straight-stacked build was an aesthetic choice, to reflect the cinder-block in our home design. I’m sure staggered would be more robust, but this was only ever going to be temporary. It’s already lasted six weeks longer than we expected! We will be using rebar when we eventually use these bricks (and others) to build a nearby wall. Thanks for stopping by!
Diane Bangs
Andy, Tell me about the blue, green and white lights??? in the left corner of the picture. Did you make them, buy them? Diane
Andy
Hi Diane. Those are actually planters, like this one: https://www.instagram.com/p/yIX4dyC6iV/ We picked them up for about $5 each, end of season at Crate & Barrel. They easily dent, and quickly looked bad, so we just stored them. Then I had the idea of making a sculpture (of sorts) by gluing them together and spray-painting. Turned out okay.
Pingback: looking back: 2016 | fogmodern
Beverly
What type of liner did you can, and where can one purchase one? Thank you.
Beverly
Correction…What type of liner did you use?
Also, how long did the pool ended up lasting?
Andy
Hi Beverly. I really can’t recall what type of iner it was, sorry. We bought it from Amazon, I think. Nothing special about it. We only had it up until the weather got a little cooler. Cleaning it was the only issue. This was just a fun, spontaneous (and definitely temporary) project – if you want something more robust, I would recommend adding a filtration system.
Tony Ronneback
Hi Andy
It looks really good.I think that even I could manage one length of it. Good to see that you are still receiving messages.
Tony.
Andy
Hi Tony! Yes, still receiving comments. I actually replied to a few this morning. Just wish I could find the time to start posting again!
Samir
I live in Adelanto, Ca where it gets really hot doing the summer. I have two small boys that love your pool. I’m looking forward to building me a pool. I love this idea.
Andy
Hi Samir. Glad you and your boys like our pool! Hopefully something similar will provide some respite during the hot summer. Good luck!
Irene Kavanagh
Hi Andy, Pool regulations here in Australia are so strict with regard to fencing, distance from the house & boundaries along with engineering requirements, etc. We have decided to build a splash pool similar to yours but will need to keep it less than 30cm in height to avoid the whole council permit drama. I’m so glad we came across your post. Thanks for the tips as all we want is somewhere to cool our feet while we enjoy a nice cold drink on a hot day, We only have a very small yard which limits us for space. Love this idea!! Cheers, Irene (Victoria, Australia)
Andy
Hi Irene. Great to hear we’ve been of some help to you! Best of luck with everything and do check in to tell us how you got on. Cheers, Andy.
bram rousseau
This is very ingenious! I use a large inflatable one, and have to replace it 3-4x a year because it gets a hole. Can I ask, since there is no filtration, does the water get gunky, slimy after a few weeks? When I leave my pool out, a week later the water is pretty nasty. Do you just empty it and refill?
Andy
Thanks Bram! We didn’t use filtration so not a long (or even medium) term solution! Could definitely be upgraded though. Thanks for stopping by!
linda devries
Just love this idea. So very clever. I’m wanting a water feature that I can just get wet in. Your design is perfect. Thank you so much for sharing.
Sommer
This is an awesome idea! I am gonna try this. Where did you find the liner?