guest bath saga
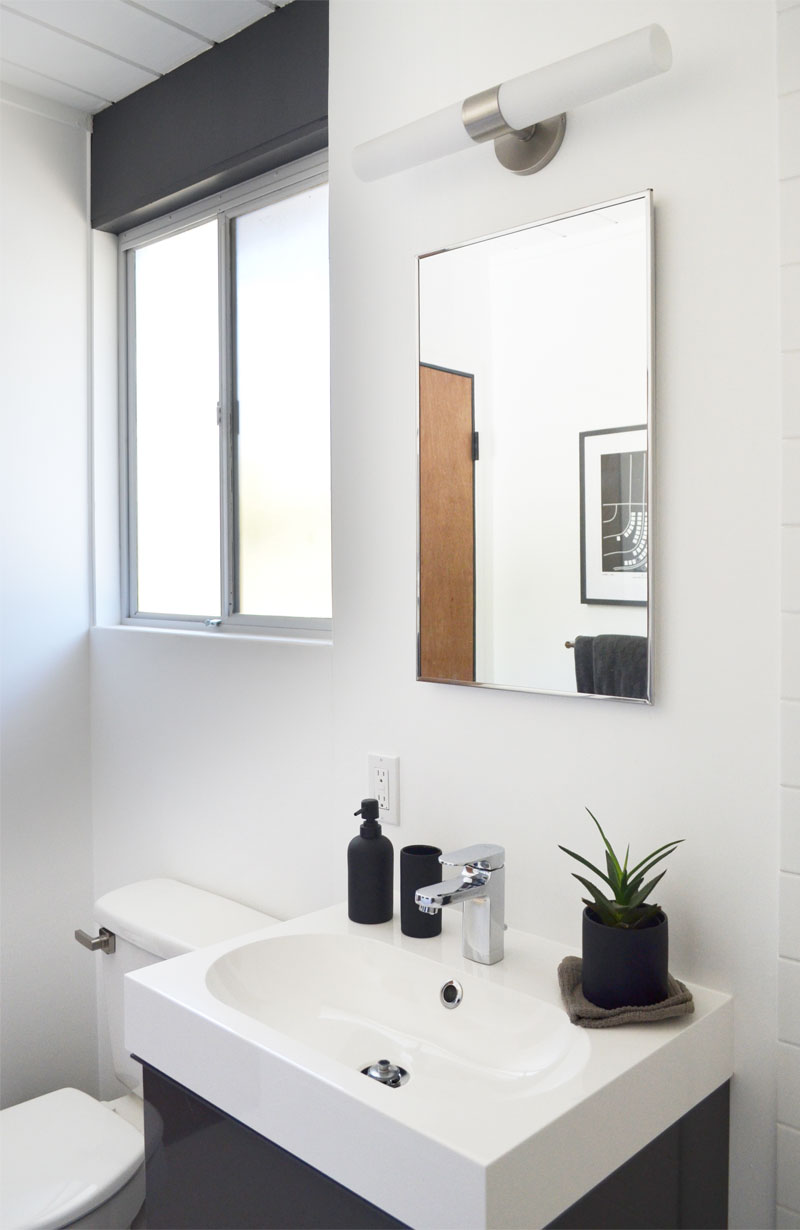
It’s been months (and months) since we finished our guest bath, but we’ve only just mustered the strength to tell you about it –partly ’cause it was so traumatic, and partly due to the all-consuming MCM home tour, which quickly followed. But it’s finally time. First, here’s a peek at the finished article.
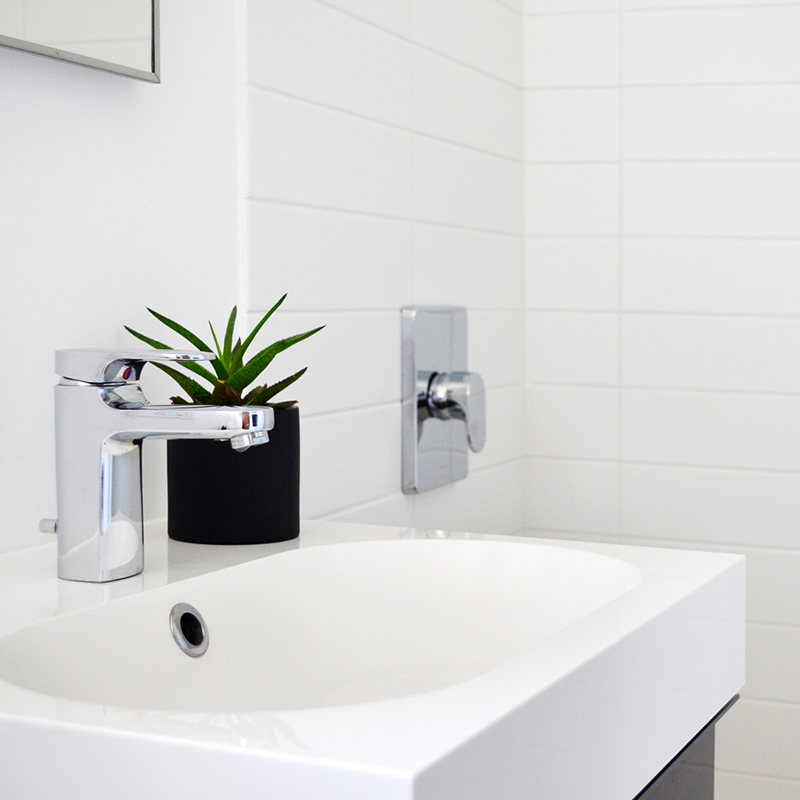
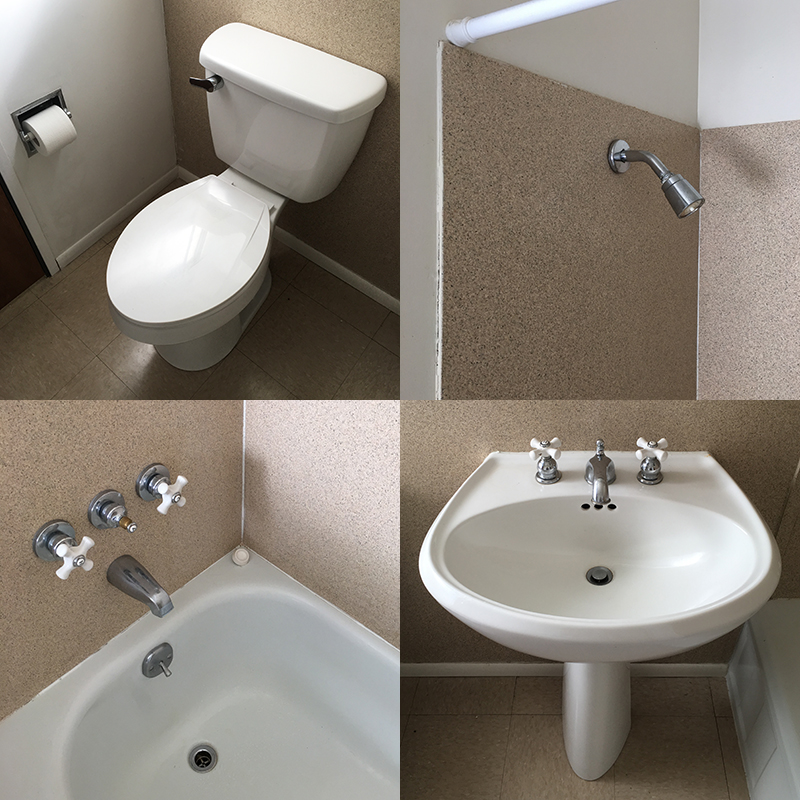
As you can see, not much color here –just our familiar monochrome palette. And that’s how we like it. Also a big contrast to the vision in brown that we inherited, below. I can’t recall seeing a model like ours with an all-original guest bath. But there certainly wasn’t much original left in ours. Just the tub.
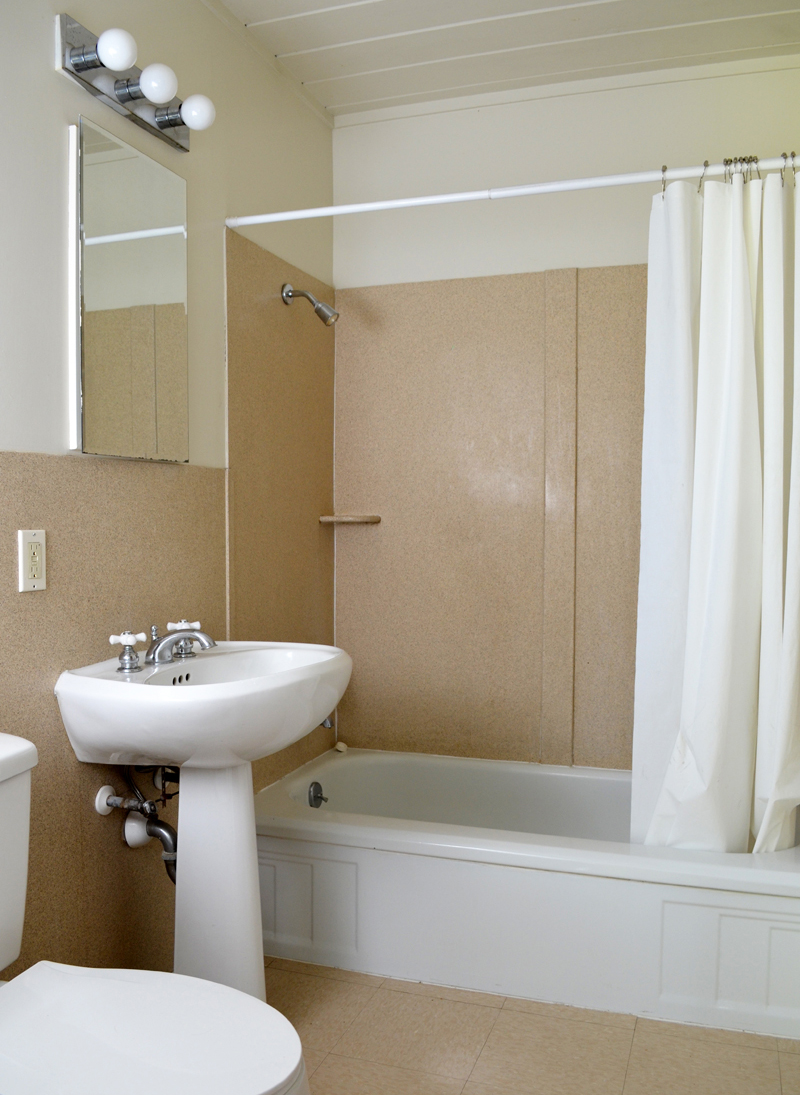
Oh, and the chrome toilet-roll holder, I think –other neighbors seem to have them. This began as a relatively small project –demo walls, replace sink, mirror/cabinet, faucet, and shower fixtures (keeping toilet and tub), paint, tile, install flooring. Simple, right? In a word, no. In two more, anything but.
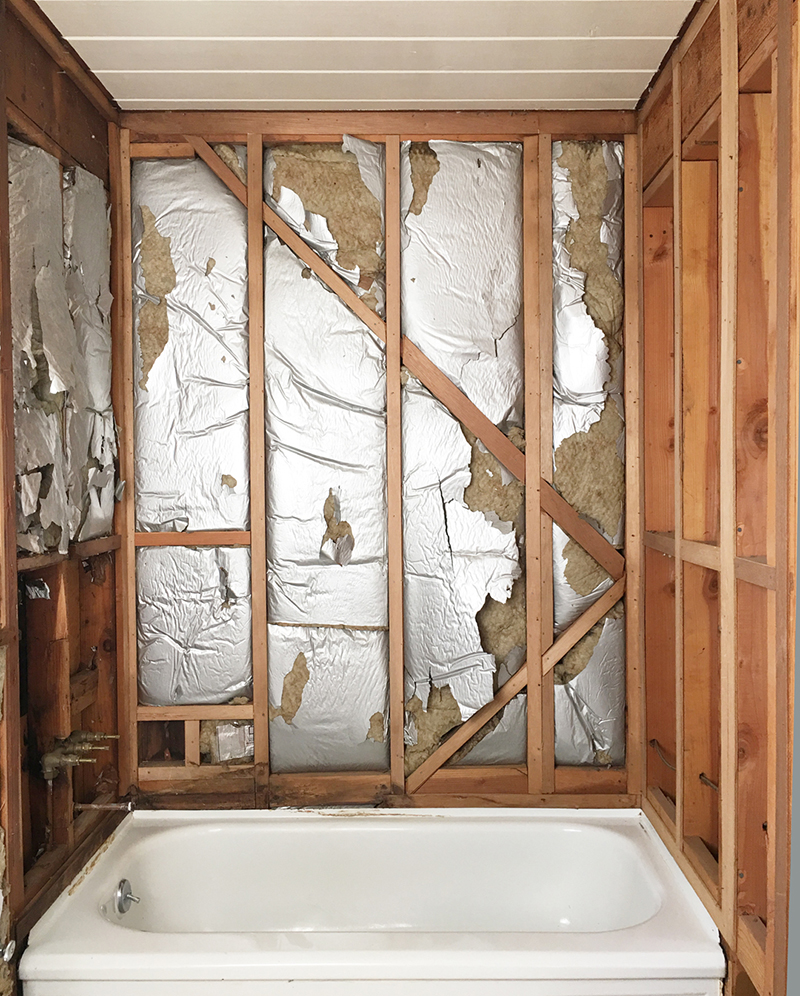
Here’s how it went. We removed the sink, then ripped-off this hideous brown/beige paneling –not sure what material this is, but it looks bad. Luckily, it detached easily, in large pieces. It left a messy surface behind, but we planned to re-drywall the lot, so no matter.
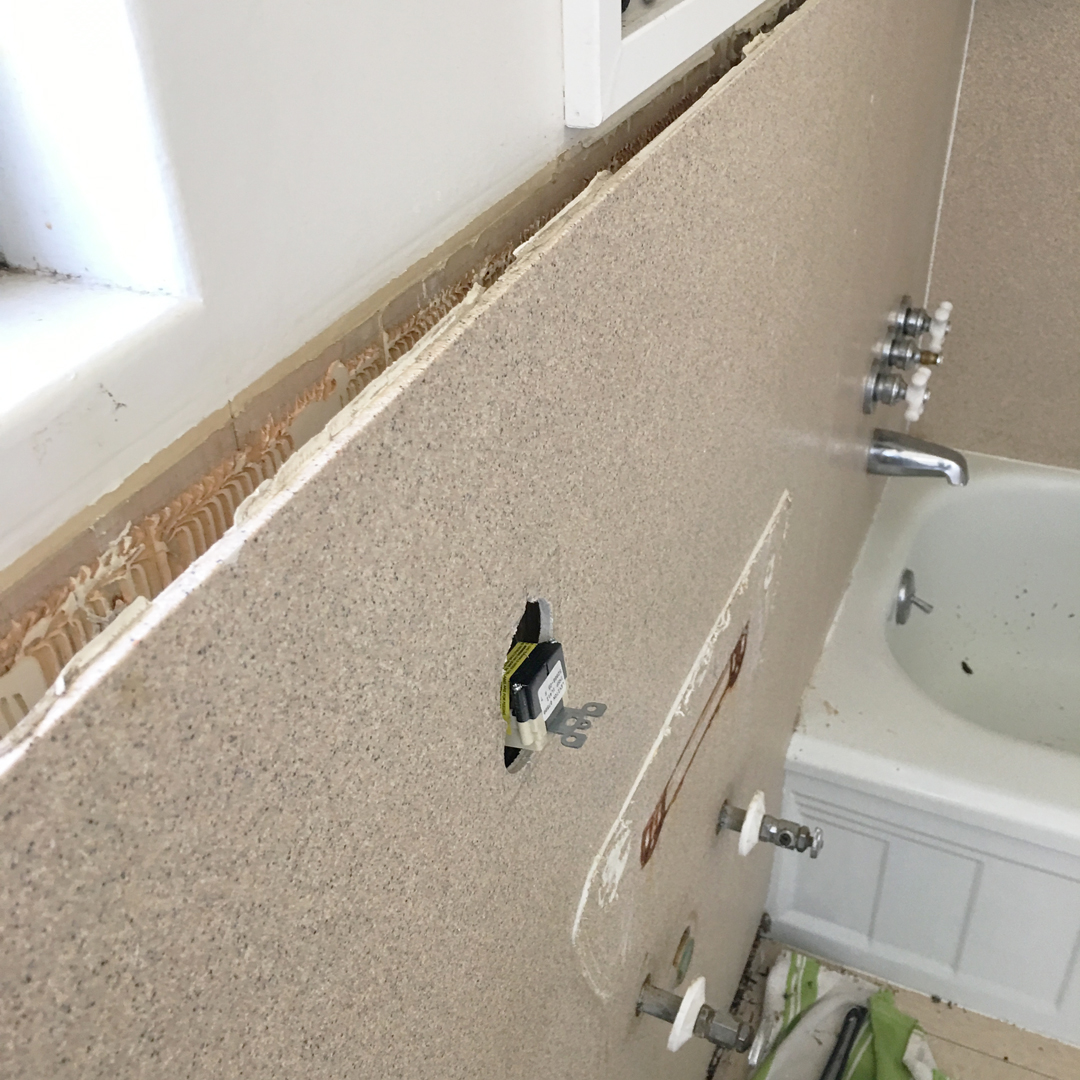
With the paneling and walls off, we could see the studs were in great shape –as per other walls we’ve opened-up. No sign of water damage either. This tub may be original, but it’s no looker. Still, likely better quality than a reasonably-priced new one. So it stays.
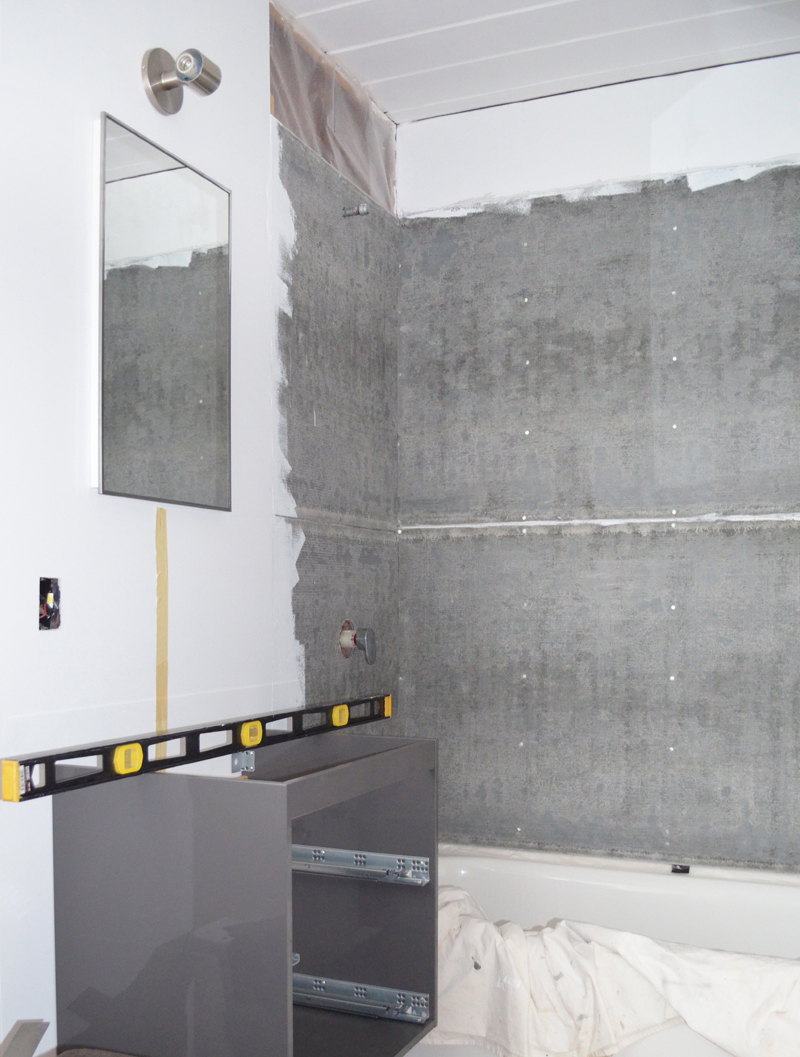
We installed a plastic vapor barrier plus backer-board, for the bath/shower, and drywall for the rest. Things were going well. We called in our awesome plumber, Brek, to change the shower valve. While he was at it, he would also fit our push-down plug, and replace the drain trip lever with a blank plate.

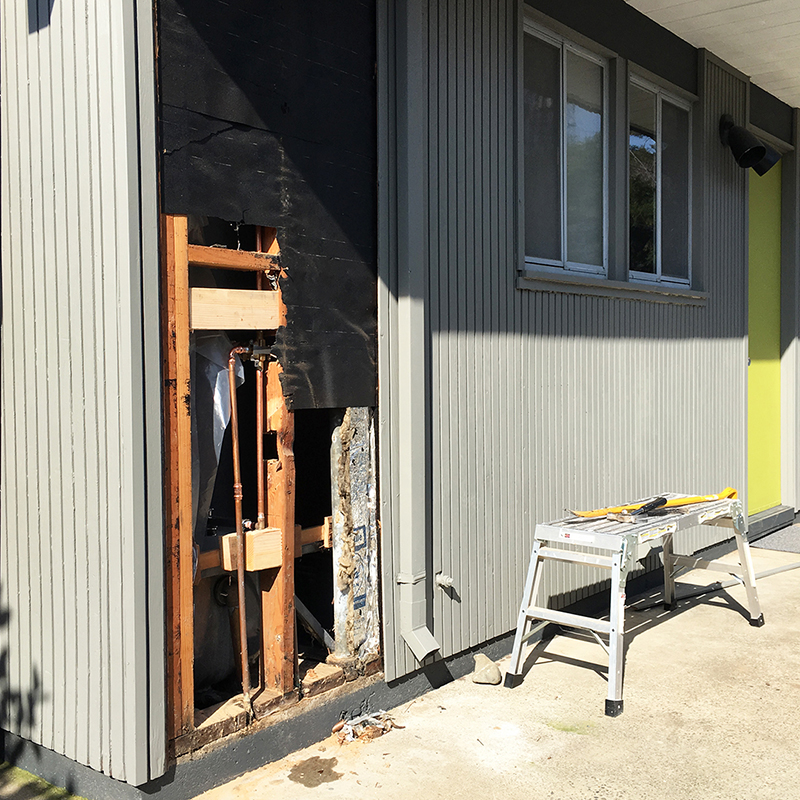
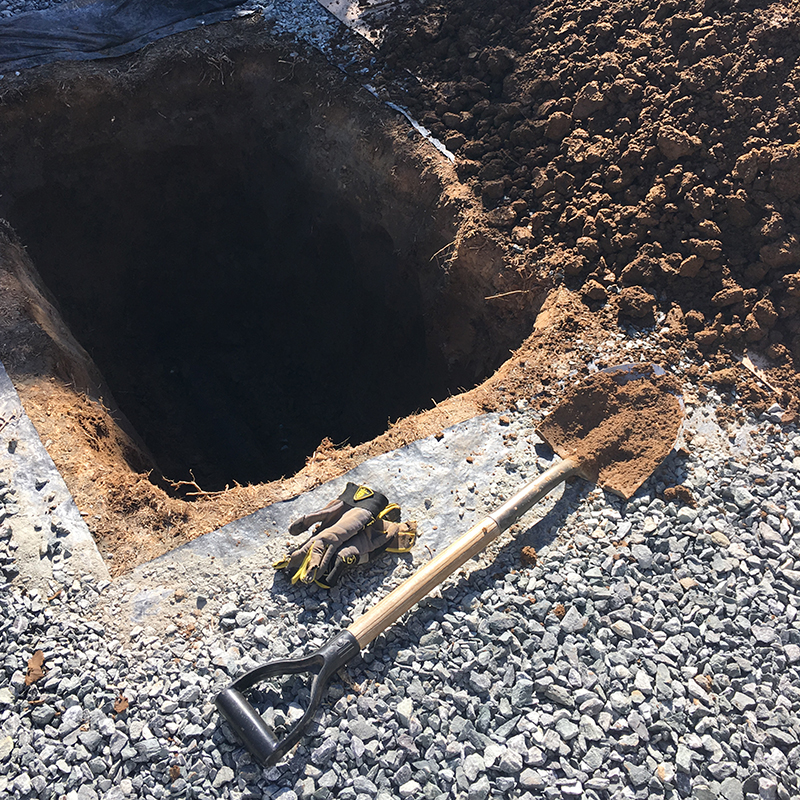
And that’s where the problems (and the panic) began. When he removed the trip lever, the pipe behind just fell away. Not good. We couldn’t gain access, to see what had happened, so we removed the exterior siding, to get a better look. This is not the kind of view you want from your bath.
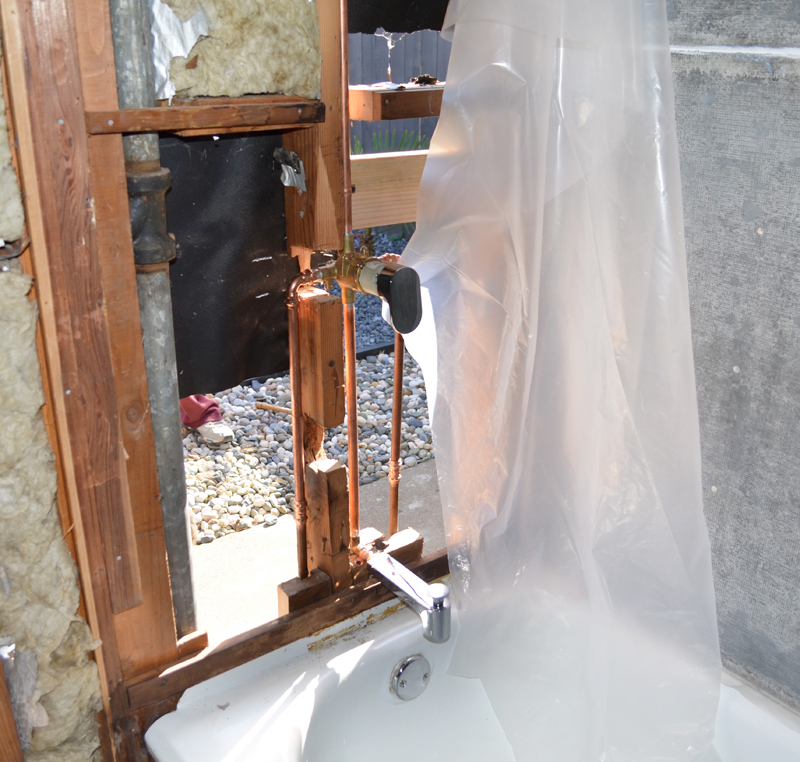
The pipe was corroded, and leaking, and water had collected in a well beneath the bath. Brek tried repairing the pipe, but it was too far gone. Then he confirmed our worst fears –to properly repair/replace, we had to pull the tub. We weren’t precious about it, but could do without the cost, hassle and time lag.
Especially with a party in a week, and overnight guests in two. But we had no choice. So we pulled the tub. More accurately, we spent about an hour wedging the tub into a series of impossible angles, before hacking-off bits of the wall, and finally freeing it. Shouldn’t have been that difficult. But it was.

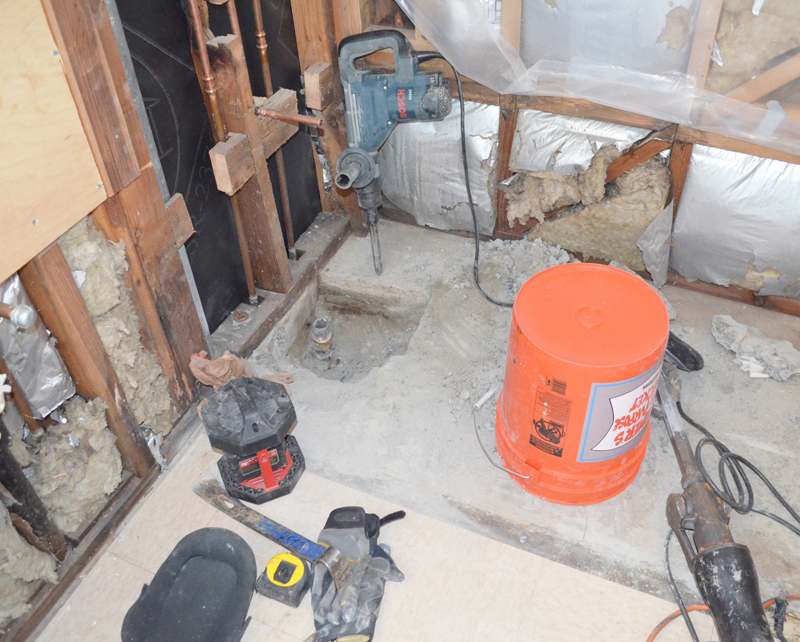
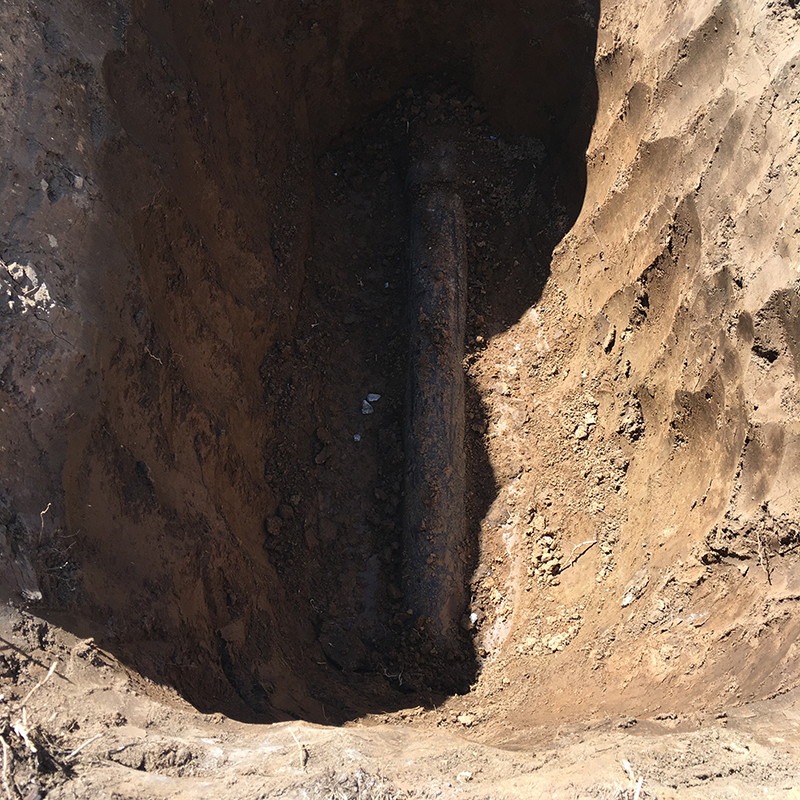
Next visit, Brek set to work, digging-up the slab to gain access –it’s so thick in this spot, it really took some work. A noisy day. Unsettling to see this level of devastation, when we only had a simple refresh in mind. But Brek replaced the pipe, and reassured us that all was well.
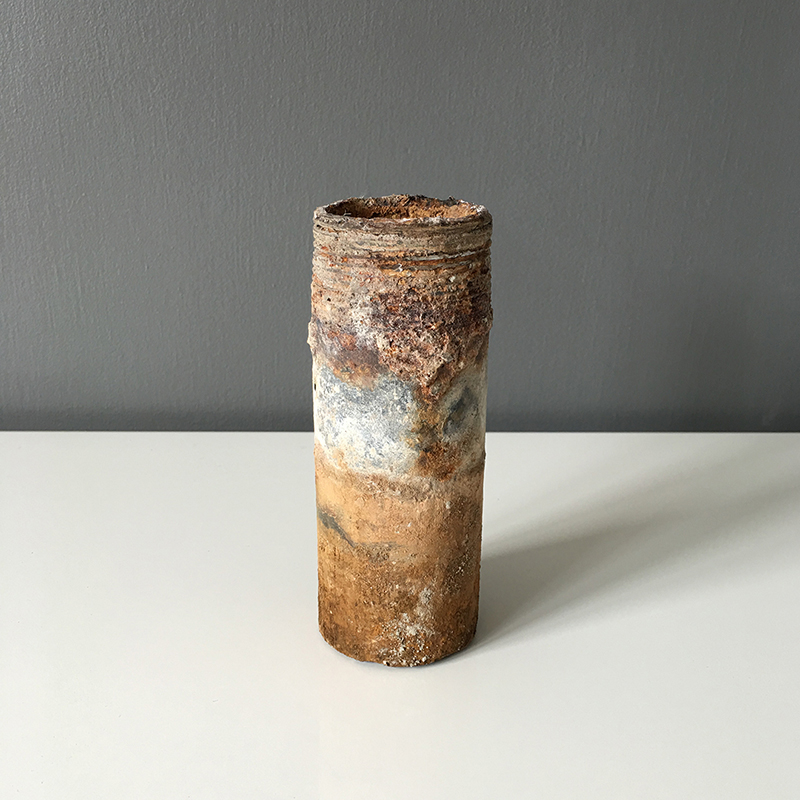
The root of our problem? This 60-year-old leaky pipe. Looks like a piece of art here, no? I think I called it a piece of something else at the time. Aside from its former failure, it now represented something positive: the end of one scary episode, and the start of another (hopefully less scary) one.
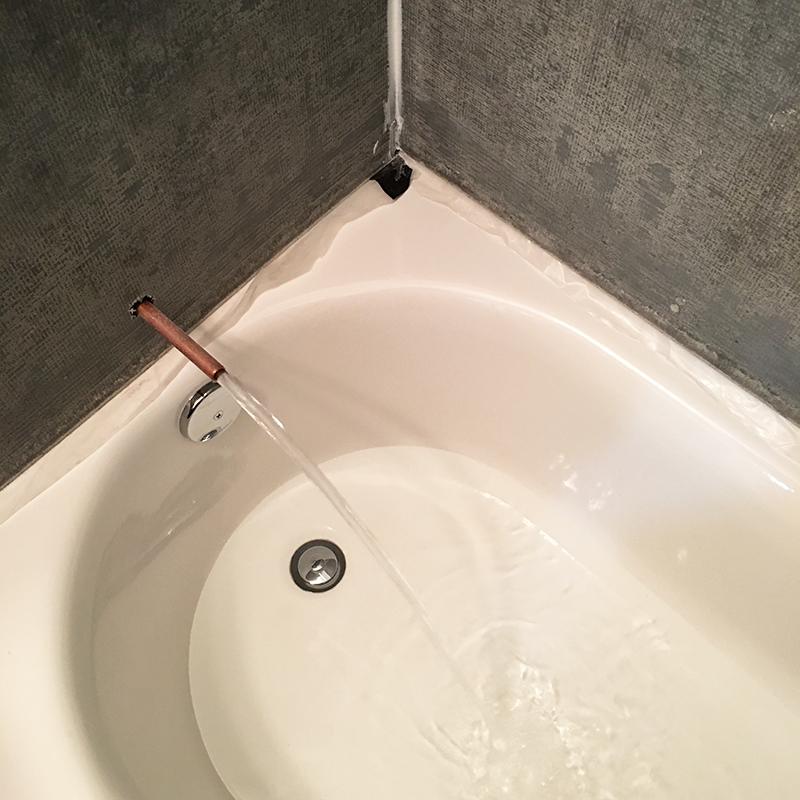
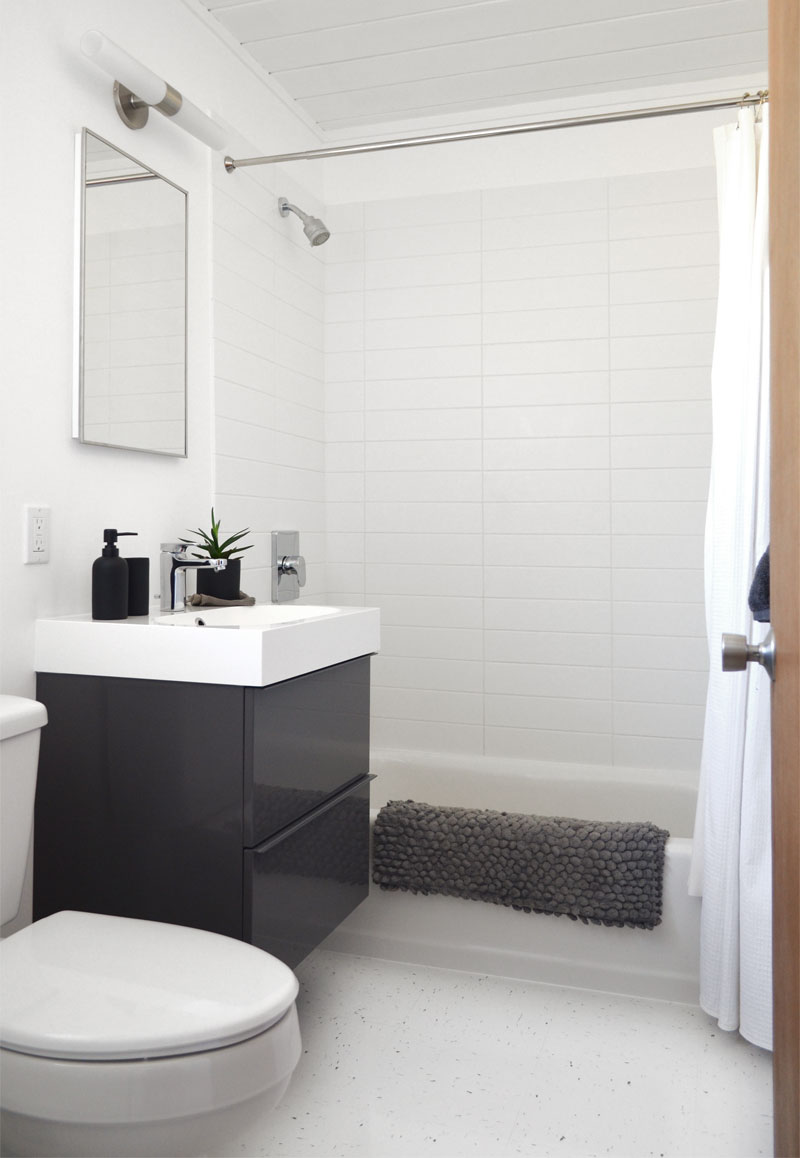
Brek installed the new tub for us, and we checked there were no leaks. Cool. We bought the most simple, minimal-looking tub we could find (within budget constraints) and we think it’s a big aesthetic improvement. So, at least we get some gain from this unexpected ordeal.
We installed the vanity, recessed mirror/cabinet, and light fixture, and re-did the backer-board. Back on track…or so we thought. Since moving here, we’ve only used this guest bath shower. With this out of action, we had to temporarily use the master shower –slight problem, as this was partially demo’d pending remodel.
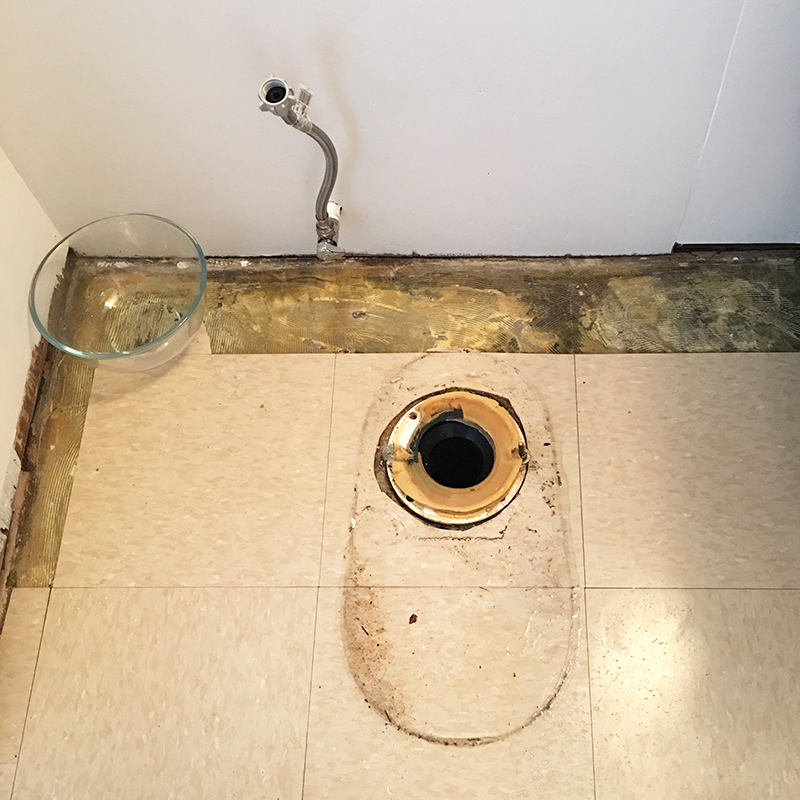
With the aid of lots of plastic, staples, and tape, we made the master bath watertight…enough. Then we saw water where we’d least expect it –over the guest bath floor. It appeared to be coming from under the newly installed tub. Cue more panic. Turns out, we had a full-system backup. And we had no clean-out, so couldn’t clear the line. For the next day or so, we proceeded cautiously, taking brief showers, with one of us monitoring for leaks. Nothing at first, then we saw water seeping from the toilet base. We pulled that, and saw the wax seal was barely connected.
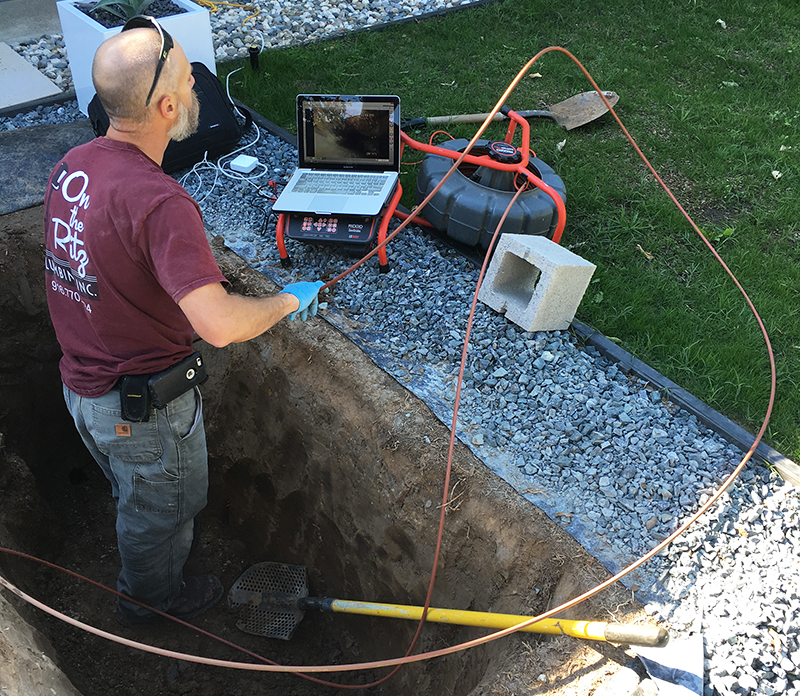
Good news, sort of –this was something we could fix. We reinstalled the toilet, with a new seal. But we couldn’t figure out why there’d been no leak before. We guessed it must be an issue down the sewer line. Brek came back, got on the roof, and fed a camera through the line. No issue with the master shower, but there was a blockage. He marked the location, and I dug a hole, so we could investigate.
At this point, we discovered our pipe was Orangeburg –common in homes of our age, but not good, and guaranteed to fail. Bummer. Chatting to neighbors, we realized that most homeowners here replaced their sewer lines long ago. It’s a wonder ours had lasted this long. Excuse the shadowy pic. Damn sunshine.
With better access, Brek snaked the line, then fed his camera through again. Definitely an issue at the far end, near our orange tree, just before it meets the City line. And the Orangeburg pipe hadn’t collapsed, but was severely degraded, so getting close. We made the call to replace it now.
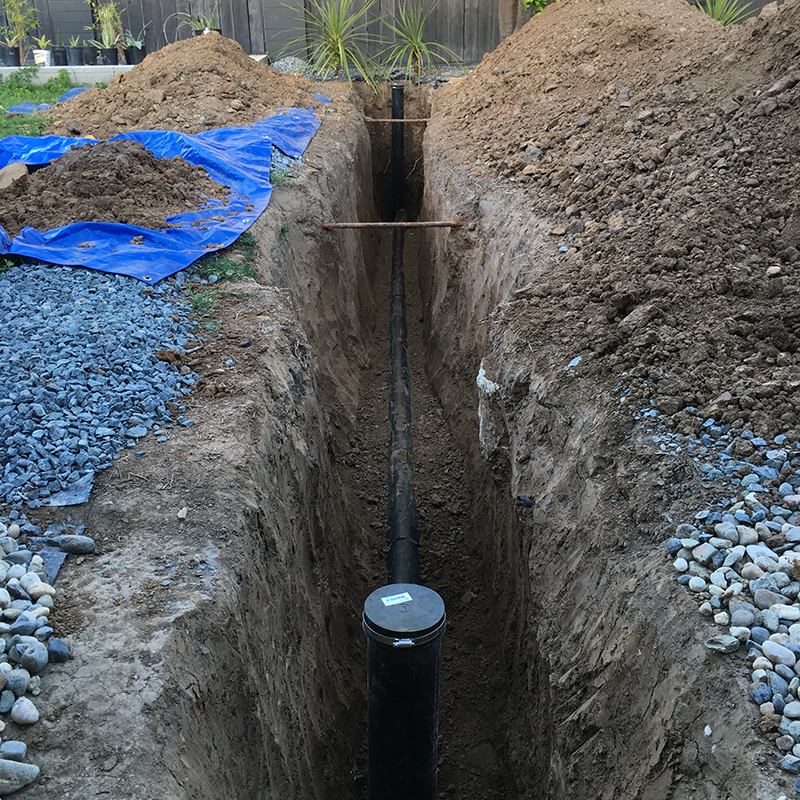
This meant more digging. A LOT more digging. I thought it would be fun to take on this part of the project, saving $$$ in the process. One of the craziest decisions I’ve made, but (ultimately) satisfying, and good exercise. The final hole was about 20 feet long, 2-3 feet wide, and 4 feet deep. With the hole dug, Brek returned, replaced the pipe, and fitted cleanouts at both ends.
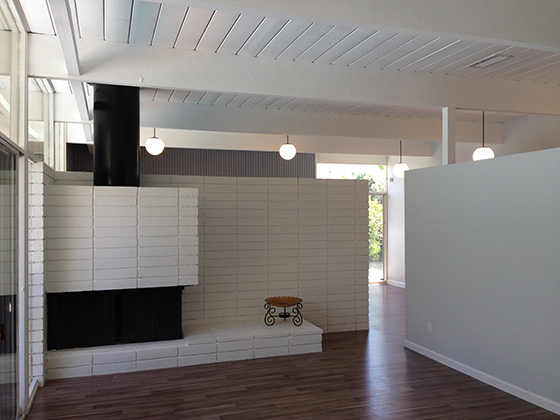
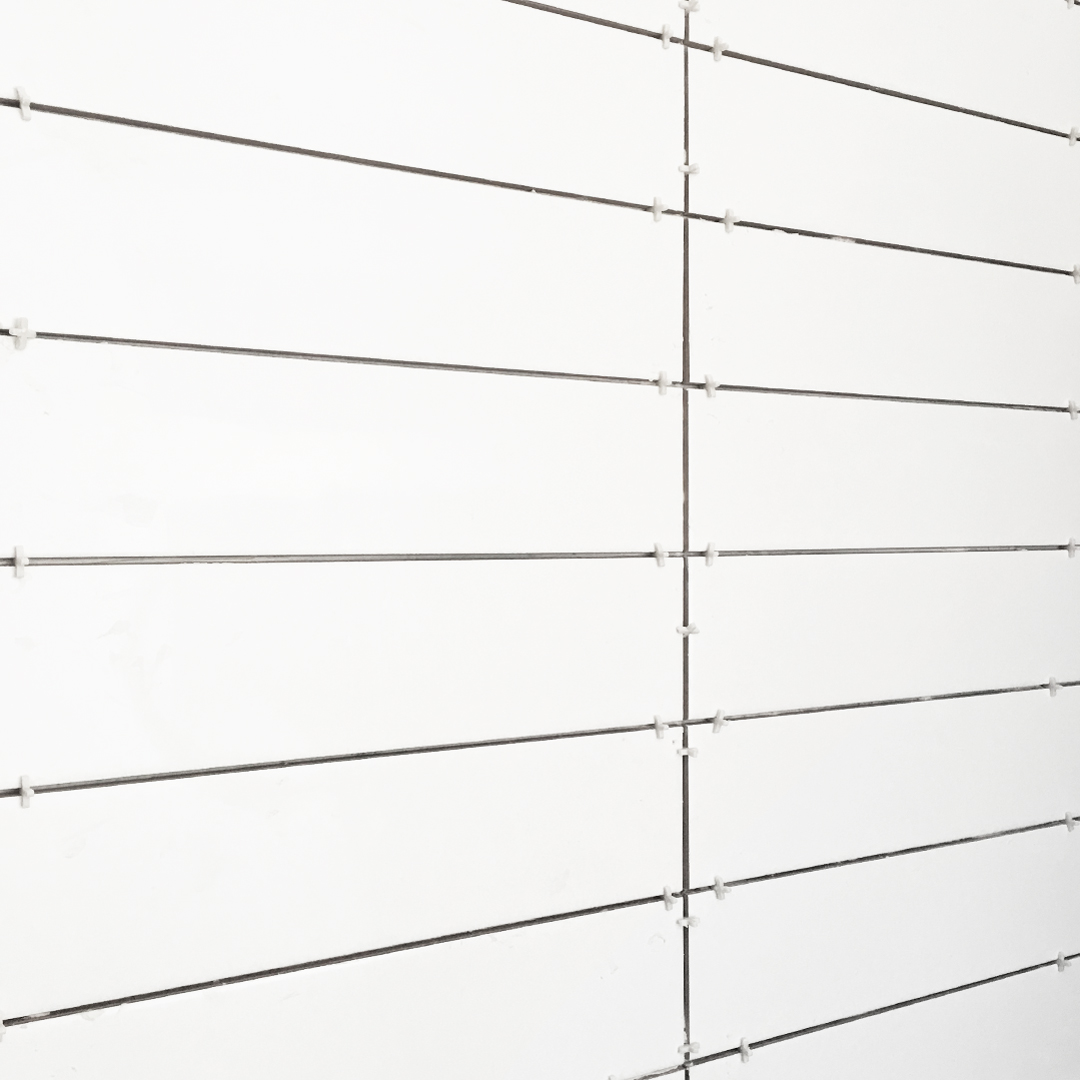
Replacing all the dirt was a beast of a job too, but that’s another story. First, we got back to the bathroom, and tiling. We used elongated 16 x 4 inch matte white tiles, in stacked formation. This mimics the narrow cinder-block (we love) used for fireplaces in Eichlers of our era, like this one, in our neighborhood.
We’ve tiled (UK) bathrooms before, but were still pleased with how smoothly this went. We added a George Kovacs light, as per our master. The recessed mirror/cabinet was cheap, but minimal. We bought the gray vanity/sink and curtain rod at IKEA, and the black pots/dispenser, and gray bath mat are from CB2.
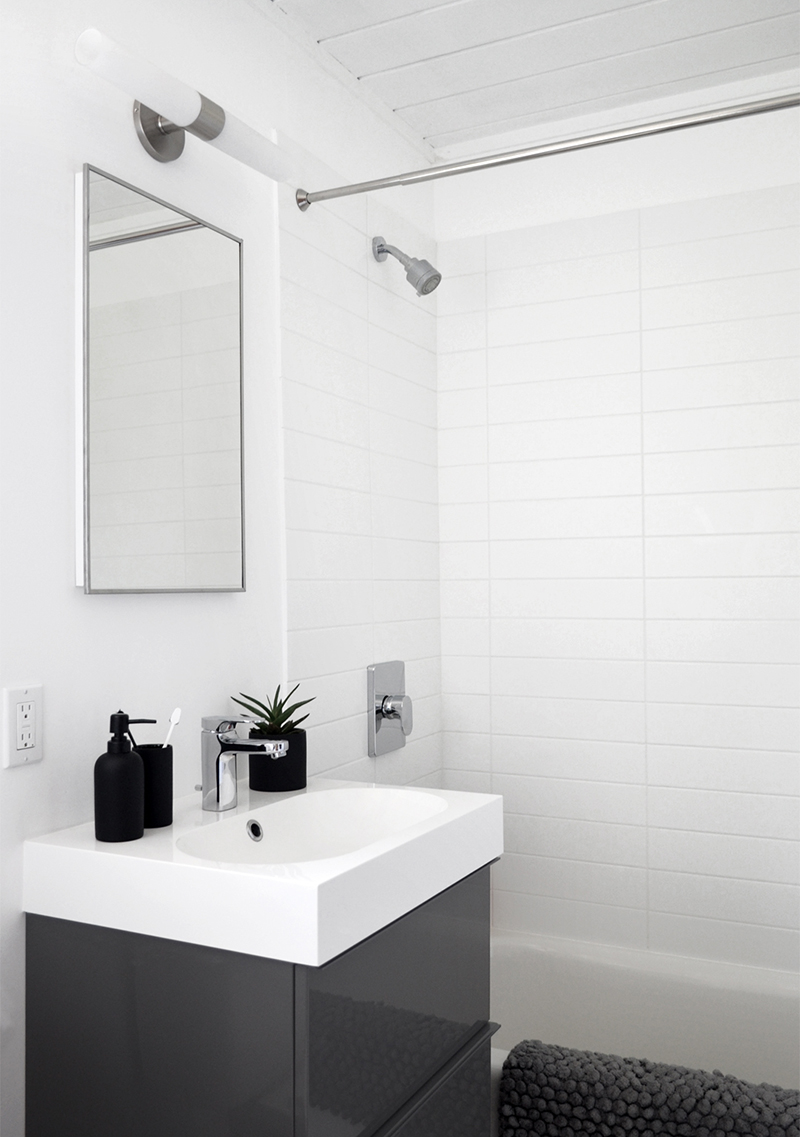
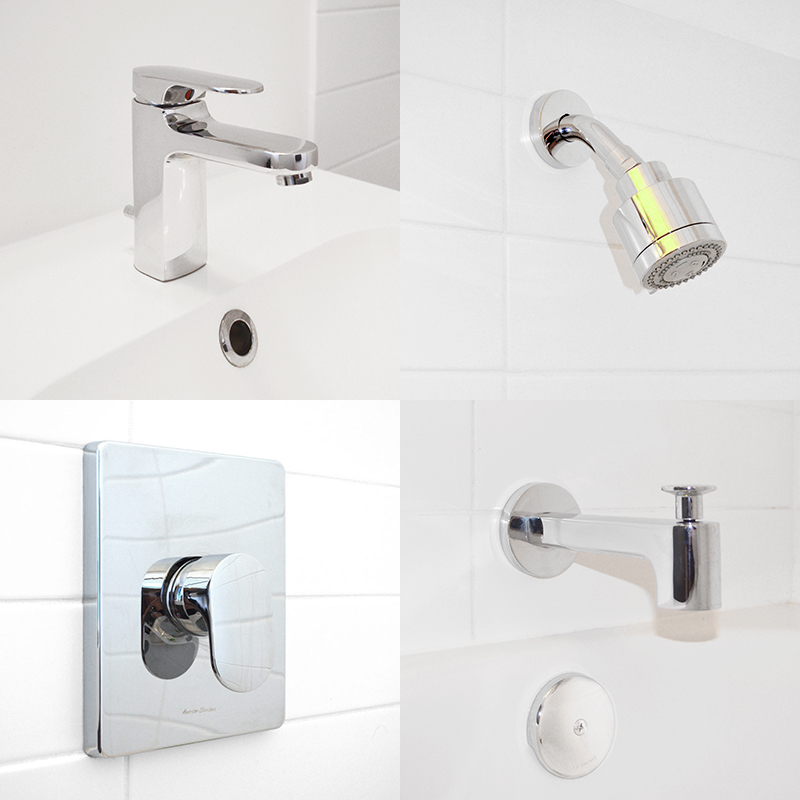
Oh, Karen handled the rest of the plumbing. Some jiggery-pokery but only minor cursing –a good sign. The faucet and shower/bath fixtures are American Standard. We like the minimal look, and the matching levers. Cutting the tile for the fixtures was challenging, until we bought a diamond hole saw drill bit.
Originally, the beam above the window wasn’t exposed. But we love how it looks elsewhere, so had to reinstate this. It makes a dull-looking window a little more interesting, provides contrast to the white walls, and a close match for our gray vanity. Oh, just in shot, we replaced the toilet seat with something less fussy.
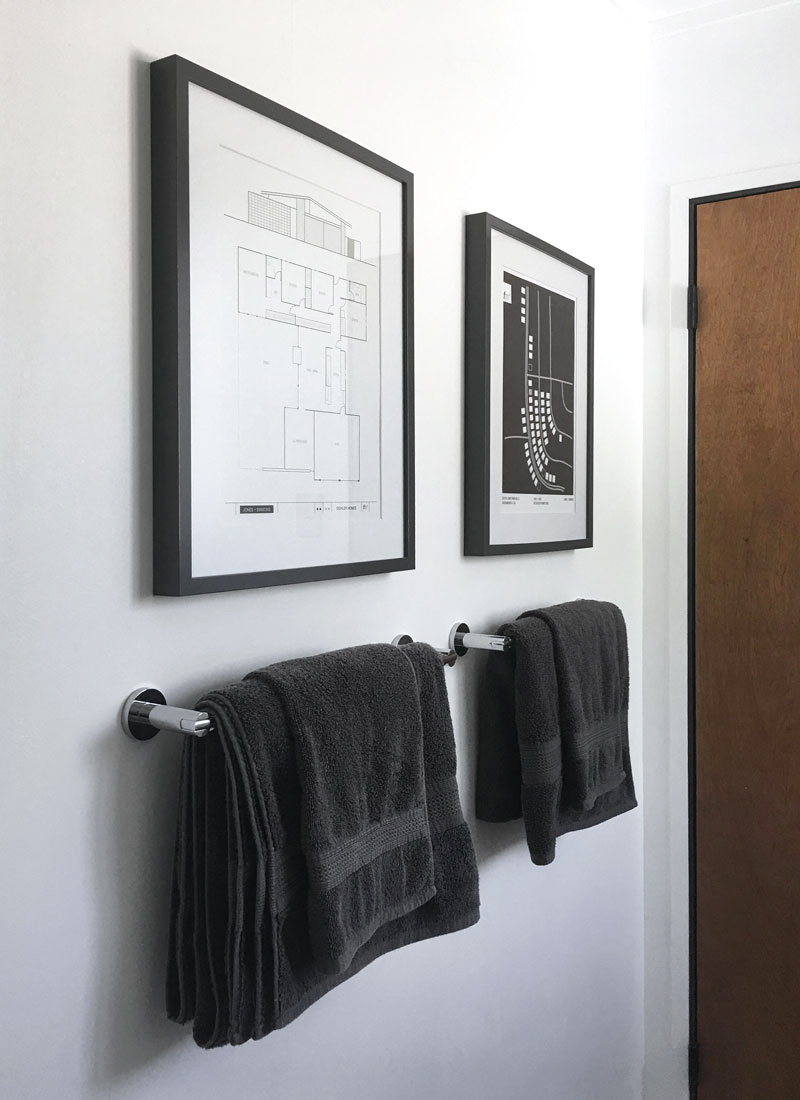
On the opposite wall, we added chrome towel rails, plus artwork Karen created –our front elevation (including our new gate) and our Eichler neighborhood (South Land Park Hills). Just in case guests forget where they are. Better still, we could add a “you are here” marker on the floorplan. I’m kidding. Kinda.
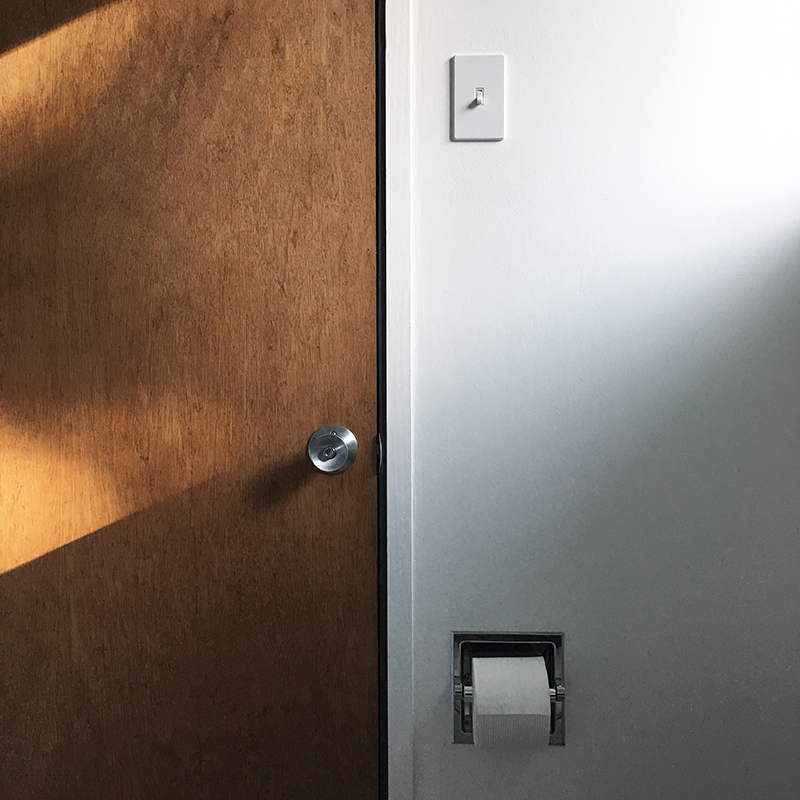
As you can see, the chrome toilet-roll holder survived, after a good scrub and polish. We also replaced the light switch/plate. And the door handle (installed previously) is the privacy version of the Schlage Bell knob, as we’ve installed throughout.
Final stage was flooring, though I didn’t take process pics –guess it’s too routine now. On that note, we’re about to install VCT in our fourth (and final) bedroom. Plenty more to do there though, so a post is some way off. But this flooring finished-off the guest bath –and we like the clean, white, simple look.
And that’s that. Not the easiest of routes, but we got there. Because we want you to finish reading our posts, we didn’t include every little detail of this saga. As a result, it probably doesn’t do it justice, from a time taken, hassle caused, and stress incurred perspective. But I’m sure you get the gist. More soon…
Save
Save
tony
Hi Andy. Well, for the smallest room, it was almost the biggest effort. Digging that channel for the pipe must have been back-breaking too. However, looking at the result you have done a great job. Mind you, a lot of your efforts are under cover. Very well done on a splendid job!
Andy
Hi Tony. Tell me about it! This turned into one of the most drawn-out, painful projects we’ve undertaken. Still, now it’s done, we’re happy. It looks way better, and the plumbing should be good for a long time. Thanks!
Frank Lippert
And now, I have a blog to guide our update. Should be a piece of cake, second time around, right, friends? Right? Lie to me! 🙂
Andy
Ha! I would think you’ll want a touch more color in there, no?! Either way, it’ll be a breeze, I’m sure! And we’ll happily consult on the project 🙂
john hendricks
We went through many of the same things (!) but your results are beautiful…I think that neither the basin or that crummy wall covering are original circa 1955! We had a different sink and some sort of aluminum tile with a colored coating on the shower/tub etc. It didn’t look better with age….
Andy
I bet you did, John! Thanks, glad you like it. Yeah, we had a license to start again. Sometimes easier that way…aside from all the problems you inevitably uncover!
christa
What a PITA, but the results are perfection! Well done.
Andy
Hey Christa! Yeah, tell me about it –this was a tough one. Glad you like it. Thank you!
Ol
I’m so so jealous. One day our bathrooms won’t be full-on yellow/blue fixtures (matching tub, toilet, sink AND tile)! One day…. The surprises you detailed here are the stories of my nightmares and why we haven’t gone down that road yet. You handled the unexpected like the pros that you are. This looks FANTASTIC.
Andy
Thank you, Olivia! It really would have been a breeze, aside from the issues that cropped-up. We should have done this ages ago, but I think we both had a feeling it would be problematic, as bathrooms often seem to be. Still, a sense of satisfaction once it’s done, and everything works! Look forward to seeing what you do, in due course.
Brooke
Looks nice and fresh! Great “little” bathroom remodel. I really like the tiles you’ve used. I’ve been struggling with tile selection for our bathroom and thought of using something more geometric but after seeing the elongated tile I may just stick with something simple like yours since it looks so nice and wont date quickly.
Andy
Thank you, Brooke! We always had these tiles in mind. I know the trend is towards more color and pattern, but we’ve always preferred simple white bathrooms. We’ll use the same tile in our master, when we get that far.
christa
Andy, would you mind sharing the source for the 4×16 tile? I’ve been looking for something similar.
Andy
Sure! After shopping around, we bought it from South Cypress –I think this was the one. Let me know if you have any other questions.
John
You get a A+ for all the work. I have a pop up drain in the tub too and bought a stainless steel mesh drain cover that fits over the drain when open to catch hair. Did you add a wood frame around the siding to access the pipes in case of another problem?
Andy
Thank you, John! A drain cover would make sense. We didn’t add anything to the siding. We optimistically think the problem is now solved, long term. If the worst does happen, it’s actually pretty easy to pop off a panel of siding. Fingers crossed though.
John
You could always go back and add the cost for each room to the floor plan picture. lol
Andy
Hahaha! I think we’d rather forget those details, John!
Greg
Great work! I guess that Orangeburg was used in 1950’s-1960’s across the US. Our neighborhood is rife with it, too.
Andy
Thanks, Greg! Yeah, mainly in that time period, thanks to the post-war housing boom. Happy that we no longer have it!
Sima
Your bathroom turned out beautifully! Andy, would you mind sharing the bathtub and toilet model information? Thank you kindly.
Andy
Thank you, Sima! Glad you like it. You know, the toilet was installed (incorrectly) before we moved in. Not sure what the model is, but it’s nothing special. The bath is American Standard –available here. Hope that helps!
Sam
Lovely!! Great end to a dramatic story. Do you recall the model of the sink and tub fixtures? We are choosing ours now for two bathroom renos and I quite like your choices. Thank you, and congratulations on completing another project. 🙂
Sam
Never mind, found them (Moments). Thanks! 🙂
Andy
Sorry, Sam, missed this ’til now. Glad you found them. And thanks for the kind words. Let me know if you have any more questions.
Chris
Love the bathroom.. especially the long wall tile. Two questions
Do you remember the name of the grout you used.
What tile did you use on the floor?
Andy
Thanks Chris! I honestly don’t recall, sorry. And the floor is just a continuation of the VCT seen all over the house. It works pretty well in bathrooms and kitchens.
Zackn9ne
Can you tell me who makes the door to the guest bath shown. Thank you for the info about the door knob.
Andy
Hi there. The door itself is original to the house. But I believe you can pick up something similar from Lowes, for example. The door knob is from Schlage. Again, widely available. Hope that helps.
S.C.
What size subway tile did you use for the walls? It looks stunning.
Andy
Hi there. Glad you like the tile. It was a great find. Unfortunately I can’t recall the exact size – we sold the house about six years back – but I know we tried to match the dimensions of our cinder-block, original to the house. I’m thinking it was maybe 12-15 inches wide x about 4 high. We just did lots of web searching. Good luck!